We have moved domains… please follow us at www.cre8tioncrochet.com
Christmas Wine Bottle Wrap December 6, 2012
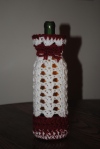
Wine Bottle Crochet Wrap 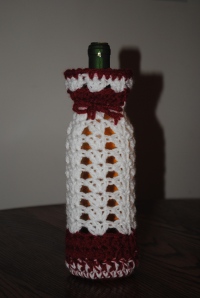
This easy and quick bottle wrapper can be used for any type of liquor. Really dresses up that bottle of wine and adds an extra touch to an otherwise outdated gift.
Made with worsted weight wool it is also affordable to create.
Materials:
Worsted weight yarn in two colors (I just happened to have Vanna’s Choice in the colors I wanted in the house but Red Heart would work just as well)
5.5mm hook
Tapestry needle for weaving in ends
Abbreviations and Stitches used:
st- stitch
mc– magic circle/ring
ch– chain
sc– single crochet
insert hook, yarn over, pull through (two loops on hook), yarn over, pull through both loops
hdc– half double crochet-
yarn over, insert hook, yarn over, pull through (three loops on hook), yarn over, pull through all three loops
dc– double crochet
yarn over, insert hook, yarn over, pull through (three loops on hook), yarn over, pull through first two loops on hook, yarn over and pull through last two loops.
Dec 2 Tog– decrease two together- all done on sc in this application-
insert hook, yarn over, pull through, (two loops on hook), insert hook in next space, yarn over, pull through, (three loops on hook), yarn over, pull through all three loops
sl st– slip stitch
insert hook, yarn over, pull through, (two loops on hook), pull loop closest to hook through other loop
dccl- double crochet cluster-
begins like a regular dc stitch – yarn over, insert hook, yarn over, pull through, yarn over and pull through first two loops on hook, BUT THEN yarn over, insert hook back into same space, yarn over, pull through, yarn over and pull through all four loops on hook.
To cre8tion wine bottle wrap:
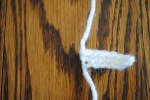
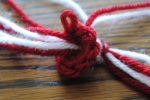
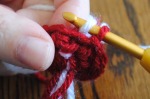
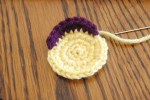
- Using both colors together- 10sc in mc
- [2sc] in every stich around <20>
- Sc in every st with 2sc in every other st <30>
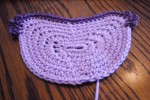
- Sc in every st around <30>
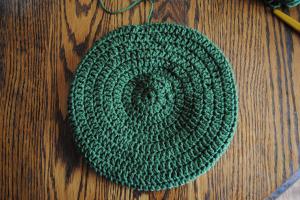
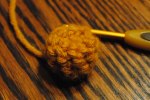
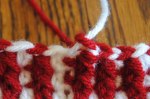
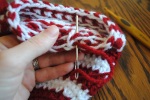
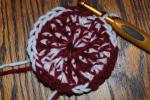 kinda looks like a peppermint candy
 - Weave in tails of mc
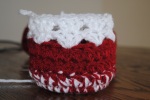
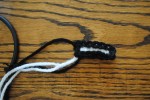
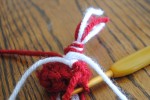
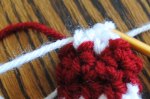
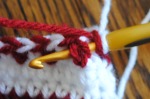
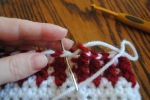
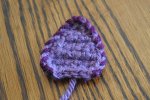
- Dc around dec2tog in every 3rd st (work as much as you can, it will not work out perfectly even) join with sl st <23>
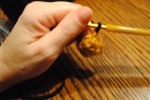
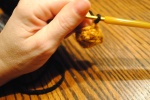
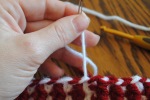
- Pull red (or color A) through white (or color B) and pull tail of white tight so that only red is showing
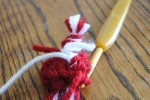
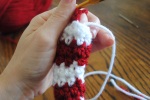
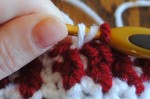
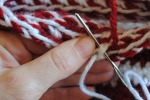
- Dccl around <23> for TWO rows
- Cut red and pick up white
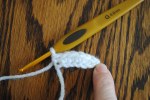
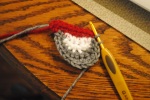
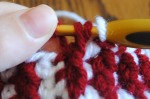
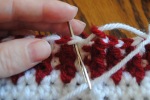
- Sl st into next sp, ch2 and then 2dc into same space, *skip two spaces and [3dc] into next same space. Continue from* around for 8 [3dc] clusters. You will be one space short on the last stitch, it is ok, sl st into ch2 space
- Weave in ends.
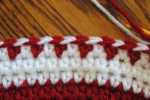
- Repeat [3dc] clusters in every third st for 8 more rows (9rows total)
- Change to red- dc around <24> for TWO rows
- Change to white- [3dc] cluster in every third st (8 clusters)
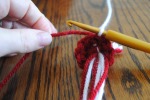
- Change to red and sc around <24>
- Take three strands of red about 20” long and knot at one end, braid and knot at other end. Weave through row of [3dc] clusters directly before double row of dc red. Tie in a bow. You are done!
I hope you enjoyed making this wine bottle wrap with me and as always if you have any questions, place a comment here, on facebook or through email at cre8tion@ymail.com
If you like what you see SHARE IT. Click on any of the social media links below! Thanks!
Have fun and happy CHRISTMAS hookin’
Childs Slouch Hat with Ribbed Edge December 4, 2012
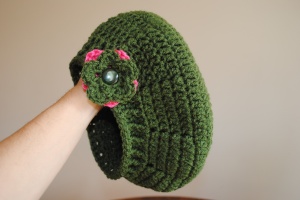
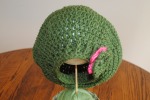
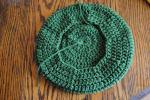
Childs Slouch Hat with Ribbed Edge
![]()
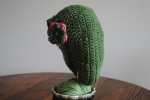
This slouch hat is designed to fit a young child (5-8 years old) but can easily be modified to fit anyone. For pattern help visit us on facebook
Materials:
Red Heart
5.5mm hook
Abbreviations and Stitches Used:
st- stitch
mc- magic circle/ring
sl st- slip stitch
ch- chain
hdc- half double crochet-
yarn over, insert hook, yarn over, pull through (three loops on hook), yarn over, pull through all three loops
fpdc- front post double crochet
yarn over, insert hook behind post of stitch from bottom to top, yarn over pull through (three loops on hook), yarn over and pull through 1st two loops (two loops now on hook), yarn over and pull through all loops on hook
dec2tog- decrease 2 together (all done with double crochet in this application)
insert hook into space yarn over pull through, insert hook into next space, yarn over and pull through 1st two loops, yarn over and pull through both loops left on hook
Notes:
When using the seamless method (link in pattern) the decreasing rounds may seem strange at first . Each dec2tog will go into the space where it was done in the previous row. This place will move as you work your way around the hat. It should be easy to locate space though. If you are having a hard time doing decreasing rounds with seamless method you can change to your normal way of crocheting in the round to finish decreasing rounds. If you have any questions please inbox me on facebook or email me at cre8tion@ymail.com
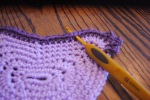
 can you see any seams??? Use my seamless method, link in pattern.
Pattern:
- Mc with 10hdc
- Using the second seamless method described here
Dc in every st <20> - Dc in every st with an extra dc in every other st <30>
- Dc in every st with an an extra dc in every 3rd st <40>
- Dc in every st with an extra dc in in every 4th st <50>
- Dc in every st with an extra dc in every 5th st <60>
- Dc in every st with an extra dc in every 6th st <70>
- Dc in every st with an extra dc in every 7th st <80>
- Dc in every st with an extra dc in every 8th st <90>
- Dc in every st <90>
- Dc in every st but dec2tog at every 8th st <80>
- Dc in every st but dec2tog at every 7th st <70>
- Dc in every st but dec2tog at every 6th st <60>
- Dc in every st but dec2tog at every 5th st <50>
- Dc in every st <50>
- Dc with fpdc in every other st around
- Dc with fpdc in every other st around
- Dc with fpdc in every other st around
- Finish with single crab stitch around
To finish off add button and flowers
Flower Pattern:
- 10sc in mc, sl st to join but do not pull tight
- *ch 1 and into next sp crochet as follows, 1hdc, 2dc, 1hdc, 1sc. Sl st into next space and repeat from * four more times. fasten off
- check that hole is right size for button and fasten center and weave in ends
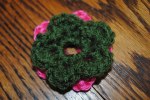
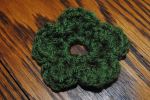 Layer flowers for an even cuter look!
I hope you enjoyed cre8ting this with me and as always
have FUN and happy hookin’
If you like what you see share it…. click on one of the social media sites below… pinterest, facebook, google+ and more!
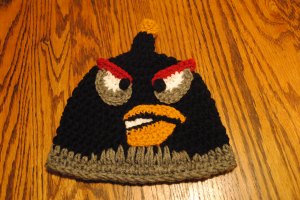
Angry Bomber Bird Hat
Angry bird bomber hat
Notes:
*whenever you do applique or specialty work try to use the smallest tapestry hook possible for all weaving and sewing for a neater look
*for a seamless look on your hat follow one of the seamless methods found here
Materials:
4.0mm hook for appliques
5.0mm hook for hat
Vanna’s choice yarn in yellow or gold, white, black, grey and cranberry
or any worsted weight (Red Heart is a good inexpensive alternative) in the same colors
embroidery needle for weaving in ends and attaching appliques
To cre8te the hat:
- Mc 6sc join with sl st, do not pull center tight
- 8sc around
- 8sc around
- 8sc around, pull up on loop to make larger and remove hook, turn piece inside out (you want the “wrong” side to show) and pull tail through center hole, pull tight and fasten off tail of mc (if you don’t do this now you won’t be able to get to it later)
- Insert hook back into loop going the normal right way and sc once around <8> join with sl st and cut yarn long enough to change color and weave in later
- Change color by picking up black yarn and pulling through yellow yarn, pull tail of yellow yarn tight so that only black yarn shows and hdc around <8> do not sl st to finish round yet * work over tails but leave out enough to weave them back in the opposite direction. At this point pull up on loop and lengthen, remove hook for easier working and weave yellow and black tails securely in opposite directions, be sure to pull tight enough so that no seem or step in row color shows. Sl st to join.
- Hdc around <8>

- Hdc around <8>
- Change hook to 5.0mm- [2hdc] around <16>
- Hdc around with [2hdc] in every 4th st <20>
- Hdc around with [2hdc] in every 2nd st <30>
- Hdc around with [2hdc] in every 3rd <40>
- Hdc around with [2hd] in every 8th st <45>
- Repeat for 8 more rows
- Change to grey
- 17 hdc around then in next st insert hook slightly above where next st would go and begin a double crochet, but do only pull hook through 1st two loops then insert back into hole and yarn over, pull through all loops on hook
- Use the same method for creating the rounded part on grey of hat, increasing the distance of where you insert your hook from edge, do the opposite on the other side for a total of 12 st
- 16hdc around to end
- 45hdc around
- Sl st around to finish
To cre8te the beak:
With white ch 7
Turn and st across 1sc in the next three, 1hdc in the next two, 1 dc in last <6> fasten off but leave ends, leave one longer tail (12” or so) for fastening
Loosely sl st around teeth with black, fasten off but do not weave in ends yet
Using yellow/gold insert hook front to back into back loop of the last st you completed (top left hand corner, pick up new color and sc to end in back loop only, chain 4, and sc back <3> sc into last sc of previous row
Continue by sc across top of white row <6>
Turn and sc all the way to second to last st. sl st in last <9sc, 1sl st>
Turn and sk 1st st, sc across <9>
Turn and 6sc then sl st end <4>
Ch3 and sc back into 1st ch, 7hdc across top of beak, 1sc, 1sl st
Finish off. Leave long tail
*Beak point will be to right.
Insert hook into the point of the beak where the white and black meet the orange, surface sl st crochet to tip of beak. Fasten off and weave in ends

Weave in all other tails leaving one long orange tail and one long white tail for fastening to hat
To cre8te the eyes:
Starting with red for eyebrow ch 9, sc across <8> fasten off, leaving long tail
Starting at inner corner of eyebrow insert hook from back to front and pick up white- 5sc turn and 1sc, [2sc] in each of next two, 1sc, 1sl st, sl into same sp and fasten off leaving long tail. Weave in short end.
In inner corner where red meets white insert hook front to back and pick up grey. Sl st into red, turn and sc around white, 1sc in 1st, 1sc in next, [2sc] in each of next three, 1sc in next three and sl st into red. Turn and sl in next 6 sts, [2sc] in next 3st st to end, sl into eyebrow and fasten off. Weave in ends.
Repeat for second eye, but insert hook from front to back in the 6th space from corner to add white for a mirror effect
To cre8te pupil:
5sc in mc, fasten off and leave long tail, weave in short tail
Sew pupil to eye where all three colors meet in inner corner
Secure beak and eyes to hat… and you are done. Hope you enjoyed making this with me. If you have any questions please leave a comment below or feel free to email me at cre8tion@ymail.com. And as always
Have FUN and Happy Hookin’
If you like what you see share it !!! Pinterest, facebook google+ and more, links below:
NEW WEEKLY FEATURE- Helpful Tips and Tricks December 3, 2012
Helpful Tips and Tricks
Here at cre8tioncrochet.com we will be adding a new weekly feature. Every week we will post a new helpful hint or trick to help you along in your crocheting. This week will be how to seamlessly change colors. There are two methods that I use.
First is to complete the row (inludding slip stitching into first stitch) and with only one loop left on hook, pick up your next color. Pull the tail of the previous color taut so that only the new color is visible on the hook.. DO NOT do a starting chain… simply crochet into your next space with desired stitch (works best with sc and hdc but will also work with dc… anything higher (such as tc) will not work well. Crochet all the way around peice and then sl st into the space right before the post of the 1st crochet. Be sure to pull tail of previous color and new color taut again to keep secure as it may have loosened as you crocheted around. When you finish off weave your ends in both directions to keep secure.
The second method is to change colors as normal (at the place in your last stich it the round when you have only two loops remaining on hook) Then for new round ch1 and skip first crochet space… place desired stitch (any stitch will work) into second space and crochet around, when you get back to the begining, crochet into the space previously left open and then sl st to join.
Both of these ways will have a seamless look and will not create a step up when changing colors.
The Trendy Elf December 1, 2012
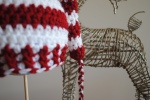
The Trendy Elf


![]()
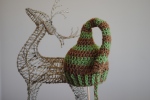
This elf hat is made in one piece construction with two stands of yarn and is seamless. This method is good for a variety of reasons, there is no seam where colors are changed, it takes less time since there is no cutting of yarn and weaving in of ends and it allows the ribbed edge to be done in two different colors giving it a unique twist. Color changes are also not done in the traditional way to give a seamless look. (yarn does not travel it simply hangs until it is needed so there is very little waste, maybe 6 inches of each color total)
This pattern is made size 6-12 months but can easily be adjusted for any size.
*To make smaller simply stop increasing rounds when you’ve reached desired amount of stitches for size and continue to work hat in that amount of stitches (nb 20-25st total, 0-3mo 25-30st total, 3-6mo 30-35 st total) to desired length
*To make larger simply increase the amount of increasing rows and finish hat in that amount of stitches to desired length
(older child would be 35-40 st, adult women would be 45-50st and men would be 55-60)
Materials:
Choice of yarn in two colors- The pattern is created using Vanna’s choice in Cranberry and White and the other hat pictured is created using Red Heart. To make the elf hat “trendy” non-traditional colors should be used, but for the purpose of contrast in this pattern, I chose traditional colors… the multi colored ribbed edge still looks unique and fashionable.
5.0mm crochet hook
Tapestry needle for weaving in ends
Abbreviations and Stitches used:
st- stitch
mc- magic circle/ring
sl st- slip stitch
ch- chain
sc- single crochet
insert hook, yarn over, pull through (two loops on hook), yarn over, pull through both loops
hdc- half double crochet-
yarn over, insert hook, yarn over, pull through (three loops on hook), yarn over, pull through all three loops
fphdc- front post half double crochet
yarn over, insert hook behind post of stitch from bottom to top, yarn over pull through (three loops on hook), yarn over and pull through all 3 loops
*Notes:
Notes will be denoted by an asterisk throughout the pattern, please be sure to pay mind to them, but here a few to start.
The only time tension should be used on this project is when colors are being changed.
*To keep colors from twisting place color A to the left of you and color B to the right of you. When pulling from color A (left) pull from underneath color B (right) and when working from color B (right) pull over color A (left). If yarn starts to tangle stop as soon as you notice it and wind one skein under the yarn to fix before it becomes a problem.
*Each round is worked without a starting chain, making it seamless. When we get to that part in the pattern I will explain in more detail with pictures but in short stitches are worked as normal (1st st in next space after where previous round was joined with sl st) and the last stitch of each round is sl st’ed into the first stitch… as long as you keep your yarn pulled tight when you change your colors you should not be able to see a seam and the colors will line up perfectly with no steps between rows.
*Whatever color you start with will be the color the raised ribs of edging are.
If you have any questions please feel free to email me at cre8tion@ymail.com or like our fb page and message me there.
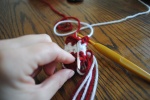
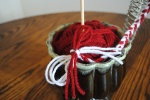
Before you begin crocheting you need to cut yarn for the braided tassle. Cut six strands of yarn (3 of each color, or 6 of one color, whatever your preference is) to 24” in length. Double knot 6 strands together at one end.
- Create mc with both strands of yarn, using both strands make sl st into ring

- Drop one strand and use the strand of the color you want to begin with (place this skein to your left-color A and the other skein to your right- color B)
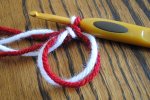
- With color A- 8sc around magic ring (around both strands) leave color B free and *do not stitch over (throughout entire project the color not currently being used will lay free and will not be weaved into the work). Join with sl st but do NOT pull tight
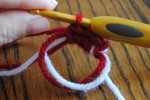
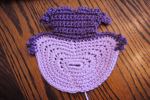
- Still working with color A, one hdc in each st <8> join with sl st {*last st of round will go into the space before the first stitch of round)
 this is not the step you will be at, this is just to illustrate where your sl st will go
 - Pull up and take hook out of piece, use hook to pull tassle through hole until you reach your double knot. Pull tight.
- Flip work over and tie tails around base of knot (close to hat) two times
- Cut all ends
- Insert hook back into piece and pull yarn snug
Change colors- with hook pick up color B (remember to pull over color A so as not to tangle yarn)and pull through st. Pull tail of color A tight so that only color B shows through work and on hook {*it is important whenever changing colors to make sure the color you just changed from is pulled tight so that rows line up nicely with no steps}
hdc around circle for two rows <8>
- Change color the same as before (pulling from under) and do two rows of hdc.
- Continue this way until 5 blocks of color A (10rows) and 5 blocks of color B (10 rows) are worked ending in Color B
- With color A- Increase round by adding an extra hdc in every 4th st <10>
- One hdc in each st around <10>
- Change to color B- Increase round by adding an extra hdc to every 5th st <12>
- One hdc in eact st around <12>

- Change to color A- Increase round by adding an extra hdc to every 3rd st <16>
- Increase round by adding an extra hdc to every 4th st <20>
- Change to color B- Increase round by adding an extra hdc in every other st <30>
- One hdc in each st around <30>
- Change to Color A- Increase round by adding an extra hdc in every 3rd st <40>
- One hdc in each st around <40>
- Complete hat in same manner changing colors every 2 rows until you have reached 9 blocks of color A and 9 blocks of color B, from start, 36rows total
- For next row you will alternate the color of the stitches with hdc st’s. The entire ribbing rows are where it is very important to remember to pull color A from underneath and color B from over the other colors.
You will have ended the previous row on color B so starting with that color hdc in next sp, drop color B and pick up color A, hdc in next, repeat till end, sl into last sp (will be on color B) - Using color B hdc into first space, using color A fphdc into post of next stitch. {*whatever color yarn you pick up will the the color of the stitch you are doing} end row with sl st and repeat for more rows for a total of alternating color rib rows. You will now you are doing it correctly when the top loop of every row is alternating being the same color as the stitch after it.
- To finish off sl st and pull tail all the way through, use tapestry needle to secure color B first and then color B.
- Finish off by braiding tail and tie into bow. Or follow one of the variations below.
- You have now finished off your trendy elf hat.
Variations:
Make the thin part of hat longer or shorter by increasing or decreasing rows
Change how rows are done- one row of each color, or mix it up and do two rows of one color and one row of the other or any combination you can think of
Do the ribs in blocks of color. In first row of ribs do two of one color and two of the other and then follow colors when doing fpdc rows
Use three colors instead of two
Put a pom pom on end of braid or do a tassle and leave strands long, use your imagination and see what you can come up with… I’d love to see pictures. Email them to us at cre8tion@yahoo.com
If you like what you see PIN IT
Have FUN and happy hookin’
Great NEW Free Pattern Resource
Watch out…. there’s a new free pattern directory in town… and I have a feeling its gonna be big!
Fellow hookin’ blogger Corina Gray of Stitch 11 and her sister Miranda Grimm of Work at Home Adventures have teamed together to create this great new FREE pattern site and unlike most pattern resources, all the patterns listed are free. Check it out, and if you are a fellow hooker be sure to add your own patterns.
Check it out!
 The Yarn Box FREE Crochet Directory
Sashay Ruffle Scarves
Get in on the trend… learn how to make these easy and cute
Sashay Ruffle Scarves
The sashay yarn has been around for a little while now and it is really getting popular. I do not have my own pattern for this one as there is really only one way to make the scarves though for some variation you can change the amount of stitches in each loop to make it fuller. The pattern calls for 10 stitches per loop but it also looks great done with 15 or even 20 stitches. The scarf will be fuller but, of course, shorter.
Here is a link to the pattern that got me started on making the Sashay Scarves. Below that you will find a link to an easy video tutorial.
Mix up how you wear your sashay ruffle scarve… it really looks great as a cowl.


How to Crochet with Sashay Yarn
For Great Deals on the featured Sashay colors click on the picture! Available through amazon.com
![]()
![]()
![]()
HAVE FUN AND HAPPY HOOKIN’
Cheshire Cat Applique- Great for a Hat November 29, 2012
Cheshire Cat Applique

“you may have noticed that I’m not all there myself”- The Cheshire Cat
My family and I moved recently and we haven’t gotten any cable tv services yet (think we are going to just get Hulu and Netflix to save money, but anyway, I digress). Well since we don’t have cable I have decided to revisit all my favorite kid movies with my 20month old daughter. Last week we watched “Alice in Wonderland”. I told my husband that I was going to make a hat of the Cheshire Cat… he laughed at me. Well, being the loving wifey that I am I told him to shut the hell up, I’d make the hat and when I did he would have to cook dinner, and then promptly forgot about my idea. Until, that is, I made a new hat for a friend’s daughter in purple and magenta stripes and I remembered all about my promise.

Here is the finished hat with applique 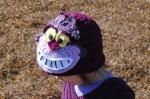


Here is the pattern for my striped hat that you will need to get started (this pattern will be released later this week). This hat is a little different as it is made by carrying your yarn. No need to cut in between colors or weave in any of those pesky ends… just one continuous go around. There is very little yarn wasted (probably 6 inches total from each color) and it is so much easier than the traditional way of changing colors. Another bonus to working your hat this way will be the ability to make ribs in two colors instead of just one. I came up with this method when I created my Trendy Elf Hat (pattern to be released later this week)
After you’ve created your hat, or any hat of choice, you will need to make your appliques for the Cheshire Cat. So let’s get hookin’.
Materials:
Yarn in:
-Four shades of purple
two different colors of choice for hat and a dark lilac and light lavender for the Cheshire Cat’s face
also needed for the nose and eyelids
(alternately you can use blue or pink with the purple for the hat)
-Yellow- for eyes
(alternately you can use white but I chose to go with the yellow of glow in the dark eyes)
-White- for teeth
-Black- for pupils, and lines on teeth
I honestly cannot give you names of colors used here since I just pulled from my stash to make this cre8tion but I will give you brand names and type of color and then you can narrow it down from there. I used three types of yarn here. RedHeart, Vanna’s Choice and Caron’s Simply Soft. You can use any yarn that you want for the hat but I greatly recommend using the Simply Soft for the appliques, it is a thinner yarn and is easier to crochet tightly with. I made the hat with RedHeart’s With Love (purple and magenta). The top of the Cheshire Cats face was done with Vanna’s Choice (dusty lilac), and Caron’s Simply Soft for the rest of the appliques (light yellow, white, and black).
Crochet Hooks in 4.0mm and 2.75mm
Tapestry needles- one large and one small
Patience, lol
Abbreviations and stitches used:
st- stitch
mc- magic circle/ring
detailed picture tutorial on my small flower pattern
ch- chain
sc- single crochet
insert hook, yarn over, pull through (two loops on hook), yarn over, pull through both loops
hdc- half double crochet
yarn over, insert hook, yarn over, pull through (three loops on hook), yarn over, pull through all three loops
dc- double crochet
yarn over, insert hook, yarn over, pull through (three loops on hook), yarn over, pull through first two loops on hook, yarn over and pull through last two loops.
Dec 2 Tog- decrease two together– all done on sc in this application
insert hook, yarn over, pull through, (two loops on hook), insert hook in next space, yarn over, pull through, (three loops on hook), yarn over, pull through all three loops
sl st- slip stitch
insert hook, yarn over, pull through, (two loops on hook), pull loop closest to hook through other loop
Notes:
- I use clover hooks which in my opinion tend to run bigger than traditional hooks so if you are using regular steel hooks you can increase the size by .25 or .50, as long as it is consistent
- Unless otherwise specified there will be one stich per space. So if you see 2sc, that means one sc in two different spaces, I will say make sure I am clear when multiple stitches will need to go into one space.
- Although no one will see the backs of the appliques I do recommend keeping them neat for easier assembly and a more polished look when applied to hat.
- TAKE YOUR TIME and double check your work as you go along. Do not pull anything tight, fasten off, or secure on, UNTIL you’ve checked (and checked again) to make sure it’s right. This is a lot of work, you don’t want to waste it by making a silly mistake (take it from me… I’ve done it a few times just while making this pattern.)
To create the Eyes:
Using Caron’s Simply Soft in yellow with a 2.75mm hook
- 5sc in mc, join with sl st * leave long tail on mc, this will be what you sew onto face with
- 2sc in each st, join with sl st <10>
- 2sc in each st, join with sl st <20>
- 2sc in 1st st, 1sc in next st, continue around, join with sl st <30>
- Do not fasten off… move on to eyelids (secure long tail from mc with one or two anchor knots)
To create eyelid: Using the darker color from hat and a 2.75mm hook
Change color on finished eye from yellow to purple with a sl st
- Crochet around eye as follows (one stitch in each space)
2sc
5hdc
2sc
1sl st - Finish off and weave in ends leaving one long yellow tail

To create pupil: Using Caron’s Simply Soft in Black and 2.75mm hook
- 5sc in mc, join with sl st- pull tight
- Fasten off and stitch onto eye, near lower edge (pic)
- Repeat for other Eye
To create the Nose:
Using the lighter color from the hat with a 2.75mm hook
- Ch2
- Turn, 3sc in 2nd sp from hook
- Turn, 2 sc in each sp <6>
- Turn and crochet as follows
1sc in 1st two, 2 sc in next two, 1sc in each of next two <8> - Turn, 1sc in each sp <8>
- Fasten off, leaving long tail (approx. 18)
- Stitch on nostrils using smaller tapestry needle and black yarn

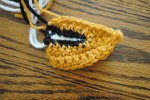
To create the Teeth:
Using Caron’s Simply Soft in White with a 2.75mm hook
- Ch 26
- Turn, 1 sc in next 7, 1hdc in next 5, 2hdc in next, 1hdc in next 5, 1sc in the next 7
- Do not turn, continue around the piece, 1 sc in each (you can work in the tail at this point)
at center of teeth (“u”shaped indent dec2tog) (11th and 12th sts) (pic) - continue to crochet around teeth with 2sc in corners, completely around one and a half times
(3 corners) - At top stitch of next corner (right side)
Chain 3, sl st into same space, sl st to top of next corner, ch 3, sl st into same space, continue to sl st to end and fasten off, leave tail
to attach to face. - Stitch on lines for teeth using Caron’s Simply Soft in black with a small tapestry needle. Be sure to secure each line so that they
don’t loosen)


To create the Ears:
Using color of upper portion of face and 2.75mm hook
- Ch6
- Sc back across <5>, ch1, turn
- Skip first sp, sc remaining 4, ch 1, turn
- Skip first sp, sc remaining 3, ch1, turn
- Skip first sp, sc remaining 2, ch1 turn
- Skip first sp, sc into last space, ch1
- Sc around perimeter of ear with 3sc in each of the 3 corners (weave in tail as you go and cut off at bottom of ear). At top of ear ch 1 before sl st’ing to finish, leave long tail, weave in to bottom of ear and leave for later attaching
- Using needle and darker color purple yarn (eyelid color) whip stitch around outside of ear two sides only, leave bottom plain
To create the lower portion of Face:
Using Caron’s Simply Soft in light lavender shade with 4.0mm hook
- 16sc in mc, do not worry about pulling all the way closed, this will be covered by teeth and you want enough flexibility to mold this
into an oval shape. Sl st to close <16> - 1sc in next five, 2hdc in each of the next three, 1 sc in the next five, 2hdc in each of the next three, sl st to connect <22>
- 1sc in next 7, 3hdc in next, 5dhc in next, 3 hdc in next, 1 sc in next 6, 3hdc in next, 5hdc in next, 3 hdc in next, 1sc in next 3, join with
sl st <38> - 1sc in next 12, 2hdc in next, 3hdc in next, 2hdc in next, 1sc in next four, dec2tog once, 1sc in next four, 2hdc in next, 3hdc in next, 2 hdc
in next, 1 sc in next ten, join with sl st. <45> - 1sc in next 14, 2hdc in next, 3hdc in next, 2hdc in next, 1sc in next five, dec2tog once, 1sc in next five, 2hdc in next, 3hdc in next, 2hdc
in next, 1sc in next 13, join with sl st. <52> - 1sc in next 16, 2hdc in next, 3hdc in next, 2 hdc in next, 1sc in next 6, dec2tog once, 1sc in next six, sc in next 16, join with sl st. <59>
- 1sc in next 18, 2hdc in next, 3hdc in next, 2hdc in next, 1sc in next seven, dec2tog once, 1sc in next seven, 2hdc in next, 3hdc in next,
2hdc in next, 1sc in next 19, join with sl st. - DONE with lower part of face… finish off leaving a long tail to stitch onto hat when finished (approx. 24”) secure to back of work and anchor with two knots. Finish off thread from mc (do not pull too tight, it should look like a slit. (pic)
To create upper portion of Face:
Using the darker of your lavender/lilac colors (I used Vanna’s in a shade of dusty lilac) with 4.0mm hook
- Starting at upper right hand “cheek” portion, in the stitch below the 1st 2hdc space on the last row, insert hook from front to back and pick up new yarn, sl st into next sc in next, ch3, sl st into same space, 1sc into next, ch4, sl into same space, 1sc in next, ch 3, sl into same space, 1sc in next 25, sl st into next, ch 3, sl into same sp, 1sc in next, ch 4, sl st into same space, 1sc in next, ch 3 sl into same space, fasten off, weave in ends.

Using same color and hook
- Insert hook into 10 crochet space on the right hand cheek (count up from first sl st of previous addition) pick up yarn and sc into next sp, 1sc in next 10, sl into next, (pic)
- Turn, sc across row <12>
- Turn sc across row <12>
- Turn 2sc in first sp, 1sc in next 10, 2sc in last <14>
- Turn 2sc in 1st space, 1sc in next 12, 2sc in last <16>, chain 6
- Turn, sl st into same space, 1sc in next 15, chain 6
- Turn, sl st into same space, ch 4, sl st into same sp, 1sc in next 13, sl st into next, ch4
- Turn sl st into same space, 1sc in next, ch 4, sl st into same space, 1sc into next sp, 1 hdc in next, 2hdc in next two spaces, sl st into next two spaces, 2hdc in each of next two spaces, 1 hdc in next sp, 1sc in next sp, sl st into next sp, ch4, sl st into same space,
- Finish off and weave in both ends. You have now completed the face.
Assemble face, starting with the mouth, take your time and line everything up before stitching… check as you stitch to make sure pieces have not moved. I anchor my pieces on first using only a few stitches before I finish stitching on, this way I can double check placement before securing permanently, its easier to pull a few stitches than pull apart all the work which would ruin the integrity of the piece. (I learned this the hard way)


Add eyes, nose and ears in that order. Stitch black laugh lines onto face if wanted to add more character.
Hope you enjoyed this tutorial. If so please Pin It
Like our fb page at https://www.facebook.com/CrochetedCre8tions
And as always happy hookin’
Hair Accessory Repository November 15, 2012
Never buy headbands or barrettes again. These adorable hair fashions are easy to make. The ones featured here are all crochet but there is a lot more to come, including more crocheted headbands and button and wire jewelry hair accessories too. As well as guest features from my fellow hookers and crafters. Stay tuned.


Let’s start with the basic crocheted flower hair clip. These barrettes were purchased extremely inexpensively… the dollar store actually. The came anywhere from 8-12 per pack for $1 each which would make these barrettes very profitable too, if you so wish to make them to sell. I sell mine for
$3- 4 each.
First things first, crochet a whole bunch of flowers… you can make your own or follow the patterns listed here in The Flower Repository.
Step1 Line the barrette in place on the back of the flower
Step 2 Thread a needle with approximately 2ft of thread (I prefer upholstery or nylon thread vs cotton thread because of the durability). Double knot and cut off excess right past the knot
Step 3 From the bottom up, thread the flower on to the barrette leaving the knot exposed by about half an inch. Insert the needle back through flower from top to bottom, slipping through the knotted thread on the way up. Pull tight and begin stitching the rest of the barrette onto the flower. You may find it easier to open the barrette at this point, be sure not to catch the clip as you stitch. Be careful not to let the thread show through to the other side as you stitch.


Your clip may have a hole at either end. Secure through this hole. If you don’t secure the clip at both ends it will slide freely through the flower which you do not want.

Step 4 Finish by running needle under the barrette several times to secure, cut thread.

And there is your finished flower barrette


AND what it looks like on my Silly Monkey

Alternately you can use different style barrettes (some of these were purchased at the dollar store as well and some at Walmart) You can also find these barrettes and other style clips at Michael’s, AC Moore, JoAnn Fabrics and The Hobby Lobby though they are much more expensive at those stores.
If you have a large enough clip/ barrette you can use the yarn from the flower to stitch it onto the barrette, just be sure to leave a long enough tail when you crochet.


Next let us take a look at some different head band options.
Simply stitch your finished flowers (or bows) onto store bought elastic bands.


You can also use crocheted head bands.


There is a great Crocheted Flower Headband Tutorial on Stitch11.com
And two more barrette ideas from cre8tioncrochet

and

If you have a tutorial or pattern for a hair accessory that you would like to have featured on my blog or as always if you have any questions please email us at cre8tion@ymail.com
Have fun and Happy Hookin… AND Craftin’
![]()
